Thursday, July 21, 2011

Two Sales You Can't Miss!

I'm travelling today but it's your lucky day!  Who doesn't love a bargain, especially when it comes to home decor and antiques?

First up, don't forget that my friend Tricia at Avolli is having an early retirement sale on her incredible inventory of Swedish antiques.  You can get 75% off her gorgeous heirloom quality pieces now!!  Yes, you read right-- 75% off!   So don't delay, click over to her website and you can score these awesome antiques:

Antique Empire Sewing Box-1820-30 SALE PRICE $275
This beautiful 19th century antique sewing box


Iron Wall Sconce, pair - Sweden, 1920's SALE PRICE $135

These beautiful iron wall sconces,

Pine Chest of Drawers - Denmark, 1840 SALE PRICE $990

This gorgeous pine chest of drawers from mid-19th century Denmark.

Now, here's another cool thing about Tricia's sale: help spread the word and be entered to win $100 cash or merchandise!  Visit her blog for details.  I've won TWICE so far (please don't hate me!)!.

***

And for twice the fun, don't forget my incredible July sale on over 100 Willow House products, too!  Lots of goodies have sold out, but there's still some incredible deals to be had.  Think Christmas, hostess, birthday gifts...

Embroidered Scroll and Stripe Pillow: Khaki and Sky
Scrollwork pillow only $12.96!


Continental Kitchen: Pot Holders

Continental Kitchen Pot Holders only $6.96

Lollie Lanterns

Sweet little Lollie Lanterns only $9.96 for the pair.

Head to my e-store to order by clicking HERE!  And... the new Fall catalog will arrive any day now, so stay tuned for sneak peeks at the new lines and old favorites.  Thanks for looking, and Happy Shopping!

Monday, July 18, 2011

Easy Peasy Lamp Shade {How To}

I am loving my new lamp and lamp shade combo in my Mom Cave...er, home office. :)  I know I have to share the space with the other four peeps in my household, but it's slowly evolving into more "mine" than "theirs."  Thoughts?

Anyhoo, the lamp shade I revealed over the weekend was a super easy project that makes a big impact when you walk into the space. 


Start to finish, I spent about 50 minutes on this.  And maybe $5 tops.  The lamp and shade I purchased with a Target gift card I'd received for my birthday.  The craft paint and sponge brushes I already had.  The stencils came from the WalMart craft section (a favorite haunt of mine) and cost under $5 for the package.


I decided on the large damask stencil and gray craft paint.


I started on the back of the lampshade where the seam is.  I figured if I was feeling my way with this, better to goof on the side that would be facing the wall anyway!  I wanted to see a full damask pattern in the center of the lampshade all the way around and parts of the damask on the top and bottom.  So the full one came first.  I totally eyeballed the middle of the shade (my scientific method you know), used two simple pieces of masking tape to hold the stencil and got started!


Notice I left the edges of the tape loose so peeling them up and removing the stencil was a clean and easy motion.  I used the paint sparingly, brushing lightly to fill in the blanks.  If it looked too light or I could see the fabric through the paint, I went back and dabbed lightly.  This stencil has lots of curly q's, so I had to brush in different directions very gently for even coverage and clean lines.  I also wiped the stencil off with a wet rag periodically (especially the back side) to ensure no extra paint went awry.


By the time I had worked my way around the entire lampshade, the paint was dry enough to start on the bottom layer.  Again, I just eyeballed placement of the stencil so pattern would look even (or close to it!).  Notice I added a piece of tape at the top to help further secure the stencil. The painting here was a little trickier since the edge of the lamp shade was involved, but again, slow and steady was the key.


You can see how I ended on the back seam of the lamp shade again.  The lines are not as precise due to the seam here, but again, this side will face the wall. :)


Once I had the bottom row done, placement of the top row was easy peasy.  I simply lined them up.  This time I started on the seam and began working my way around.  Slow and easy.  Looking good!


And here is the finished product!  The gray and white look super crisp against my purple walls and I adore the damask pattern.


Love, love, love!


So, there you are -- what do you think?  Easy peasy way to jazz up an inexpensive lamp shade!  Loving the bang for the buck on this project.

Linking up in these fabulous places:

The Mustard Ceiling


Happy Stencilling!

Sunday, July 17, 2011

A Great Reason To Thrift...{Catalog Finds}

Howdy, friends! I'm thoroughly enjoying time with family and friends in West Texas.  My camera is working overtime, so I'll hopefully have some wonderful pics to share when I get back... nothing like wide open spaces and friendly faces with a little Texas twang thrown in!

During my travels I've been catching up on catalog perusing and magazine reading {the beauty of having teens that can help with the driving!}.  In the last Pottery Barn Bed and Bath catalog I got hung up on this shabby summery vignette.

Vintage Blue Ledge

Do you love it??  Me, too.

What I don't love?  Sticker shock.  I seriously had to pick my jaw up off the floorboard of my Expedition.  The ledge alone is a whopping $449.  Yikes!  Granted, it's solid mahogany but gee whiz!
Throw in those fabulous chippy frames for $129 and you're suddenly in the poor house. 

Just me, or is that a great reason to go thrifting?

Happy Decorating... and hopefully Thrifting, too!

Saturday, July 16, 2011

What I've Been Up To {Home Office Update}

My home office is slowly but surely evolving into the Mom Cave I've always wanted!  Though I'm anxious in a way to get it finished, I have to admit I'm enjoying the process, too.  Of course, having my desk up and running is key to this enjoying-the-process mindset. :)

This week I tackled the lamp on the desk.  Remember this?

It's one of a pair of buffet lamps I bought several years ago... not loving it on my new desk!

So I headed to Target and used a gift card I'd gotten for my birthday to pick up this lamp and a simple drum shade.


The balls are actually acrylic, not glass, but I love the modern clean look and the price was right! On a side note, the desk top photographs a pale yellow, but it's actually a creamy white (Porter Paint Velvet White).  I wasn't sure what I'd do with the lamp shade, so I toyed with some different ideas (cover with fabric? add some trim?) and finally decided to break out my paints and stencils.

TA DAH!!


Hello, Lover!  I'll be sharing the super simple how-to next week. 

 Plus, I got an urge to paint this $15 flea market purchase {from 10 years ago} as part of my on-going lighten and brighten the family room project.


The brown stain wasn't working next to my chocolate suede sofa so it's time for change!

It's been a busy week, but more to come.  Enjoy your weekend, friends!

 
Happy Decorating!

Thursday, July 14, 2011

Shopping Voz {East Village, NYC}

I had a fabulous shopping experience in NYC a few weeks ago!  You can read all about the fun restaurants and boutiques we patronized over on my personal blog (click HERE).  But I wanted to share some eye candy from my very favorite stop, a cool vintage boutique called Voz, located in the East Village.

The owners of Voz have created a hip shopping stop with carefully selected wares: vintage designer clothing and accessories, books, home decor, china and crystal, and art by local artists.  I love that the shop wasn't cluttered, so you could really examine ALL of their goodies.


Ames scored a genuine crocodile handbag for a song! 


I fell in love with these vintage French illustrations the owners procured in France.  Love even more that they framed them in stock frames, mounted on a background of decorative tissue paper.  Give you any ideas for unique framing of a favorite print or photograph??


We thought they'd be perfect in her apartment, but the budget didn't allow... this time. :)


I hope you noticed the floor treatment in some of those photos... this is sheer genius, IMHO!  When they took over the space, the flooring was a light shade of laminate wood flooring -- doesn't exactly scream vintage shop, does it?  So they adhered the pages of a foreign language dictionary (French, Italian? I can't remember-- sorry!), overlapping them, to the entire floor and then put several layers of shellac down.  Alex (the very charming owner from Argentina) says he loves the floor even more now that they've hosted several soirees and a few spots have worn away in the aftermath. :)

Now, you can visit Voz online HERE to read more about the owners, their vision, their inventory, and their creativity.  And if you ever are in NY, stop in and see for yourself!  You'll be hardpressed to leave empty-handed.

Thank you, Alex, for sharing your delightful spot with me (and my readers!)!

 
Happy Decorating and Happy Shopping!

Tuesday, July 12, 2011

I Can't Resist... Rustic Meets Refined Living Room

I'm back from a long weekend in Pensacola where we fished, boated, tubed (yikes), and took in the Blue Angels show from the water.  A wonderful, relaxing time!!  I loaded up on some shelter mags to read in the car on the way down and I came across this image in July's Atlanta Homes and Lifestyles magazine.


This is the living room of the 2010 Cashiers Designer Showhouse, designed by Suzanne Kasler.  You've heard of Suzanne, right?  ;-) She's a busy lady these days, turning up in the Ballards catalog with her own product line (one of several signature lines she has out there), writing design books, and maintaining her Atlanta-based interior design business.  I love (and fully ascribe to) her theory that rooms should be collected and not decorated.  Is she singing our song or what?  Head to her website to learn more and see what inspires her.

Now, to what I love about this room! The use of ivory and blues in contrast with the rustic stacked stone fireplace, stained wood floors and ceilings, and exposed beams.   Comfy sit-right-down furniture and a sleek contemporary coffee table,  layered rugs, that fab chandelier right balancing out the antlers over the french doors... shall I go on?  With views of Whitehead Mountain right out those glorious windows, you know you're in a mountain retreat.  But she marries simple sophistication in furnishings with rustic structures and finishes to create a match made in heaven.

And this is the tip of the iceberg in this fabulous home, open from August 21 - September 5th. See the complete article in Atlanta Homes and Lifestyles.   If you're in the Blue Ridge Mountains during that time, you will want to check it out.  I'm thinking road trip?

See the entire guide to the Cashiers Designer Showhouse HERE.

Photo by Erica George Dines.

Thursday, July 7, 2011

Looky What I Found!

Well, El Presidente is carting me off again for a weekend of deep sea fishing in the Gulf!  Of course, he's rushing me out the door, so I'm just sharing this quickie post with you. On a covert "pass thru" of my local HomeGoods, I spied these little Lovelies...


Have you seen these magazine baskets before??  I love that they're flexible and sturdy at the same time!  If I was organizing a playroom, child's bedroom, bathroom, family room, or mudroom, I would've snapped these up!  The smallest was only $5.99 and the largest was only $12.99.  So for under $40, you would have four awesome baskets.

You're welcome. :)

Hope I can share pics of some beautiful red snapper next week!  Have a great weekend, friends.

Happy Decorating!

Tuesday, July 5, 2011

How To:: Banquet Table Turned Desk {Home Office Update}

If you missed the reveal of my banquet table turned home office desk, here is my new workspace!


I love how fresh it looks and feel like I can breathe a little better when I'm in the space. Since I'm all about using what I have to redecorate I thought I'd share my process with you.

I knew I wanted to cover the table and conceal all the fab storage that's underneath, but I didn't want it completely covered in fabric.  I love the tailored look on these inspiration desks.


{desk of Lonny editor in chief Michelle Adams}


A smooth work surface and a tailored skirt were my goals. I decided to paint the table top and wing it from there.  Isn't that how you approach your DIY projects? :-)


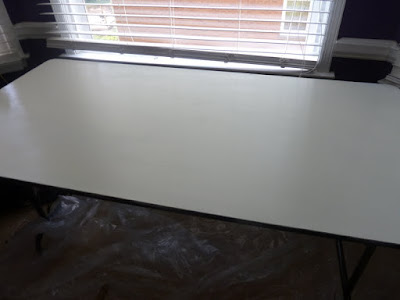
I used two coats of primer, two coats of Porter Paint's Velvet White, and two coats of poly.  Perfect.

Now, for the skirt.  I already had my fabrics for the office makeover.


I wanted the skirt to use two of these fabrics, the Tres Chic by Waverly and the Cross Section by PKL Studios.  The purple velvet is for accent pillows down the road.

I had to play around with different variations, but I eventually decided I wanted the Cross Section to cover the corners and show between the panels of the Tres Chic.  The table is 60 inches across and the fabric is 54 inches wide, so I could basically use 2 yards of the Tres Chic to create the wide front panel and the 2 shorter side panels.  Since the back of the desk fits into the bay window space and there's also an AC vent there, I decided to leave the back completely open. 


I started by cutting my 2 corner panels.  I wanted there to be plenty of overlap, so I cut them about 14 inches wide, knowing I would be hemming the edges.


And since I don't sew {really -- I don't sew}, I enlisted a little DIYer's helper in the form of hem tape.


Sorry for the blurry photo!  I found this product ridiculously easy to work with and it took less than two rolls to hem all 5 panels for the skirt. 

I used another DIYer's helper to attach the corner panels to the table... my hot glue gun.


I burned the stew out my thumb doing this!!  I had forgotten how HOT hot glue really is!


Here's the desk with the corner panels attached.  See how much storage is underneath?  The plastic drawers (Target purchase) hold school and office supplies.

I used a different approach to attach the Tres Chic panels as I wanted to be able to remove them easily if I needed access to underneath.  Enter my next DIYer's helper...


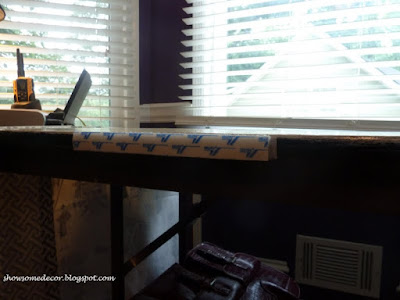
Yep.  Velcro strips. :-)


I simply adhered the strips to the edge of the table, pulled the plastic off the sticky back and pressed the edge of the fabric panel against it.  And here it is!


And a close up of how the corners overlap...

And here is the finished product again:


I was anxious to get this done, since I was "desk-less" for a spell!  Up next in the office is a new lamp (I'll be sharing the shade project with you soon), a revamp of the large dark bookcase, recovering a chair, and I'll be doing some repainting and touch-up to continue the brightening of the space.

So here is the BEFORE of my desk:


SCARY!!

And now the AFTER:


Linking up HERE for Metamorphosis Monday:

Between Naps On The Porch


What are your DIYer helpers?? What about your latest project?