Showing posts with label how-to. Show all posts

Monday, July 18, 2011

Easy Peasy Lamp Shade {How To}

I am loving my new lamp and lamp shade combo in my Mom Cave...er, home office. :)  I know I have to share the space with the other four peeps in my household, but it's slowly evolving into more "mine" than "theirs."  Thoughts?

Anyhoo, the lamp shade I revealed over the weekend was a super easy project that makes a big impact when you walk into the space. 


Start to finish, I spent about 50 minutes on this.  And maybe $5 tops.  The lamp and shade I purchased with a Target gift card I'd received for my birthday.  The craft paint and sponge brushes I already had.  The stencils came from the WalMart craft section (a favorite haunt of mine) and cost under $5 for the package.


I decided on the large damask stencil and gray craft paint.


I started on the back of the lampshade where the seam is.  I figured if I was feeling my way with this, better to goof on the side that would be facing the wall anyway!  I wanted to see a full damask pattern in the center of the lampshade all the way around and parts of the damask on the top and bottom.  So the full one came first.  I totally eyeballed the middle of the shade (my scientific method you know), used two simple pieces of masking tape to hold the stencil and got started!


Notice I left the edges of the tape loose so peeling them up and removing the stencil was a clean and easy motion.  I used the paint sparingly, brushing lightly to fill in the blanks.  If it looked too light or I could see the fabric through the paint, I went back and dabbed lightly.  This stencil has lots of curly q's, so I had to brush in different directions very gently for even coverage and clean lines.  I also wiped the stencil off with a wet rag periodically (especially the back side) to ensure no extra paint went awry.


By the time I had worked my way around the entire lampshade, the paint was dry enough to start on the bottom layer.  Again, I just eyeballed placement of the stencil so pattern would look even (or close to it!).  Notice I added a piece of tape at the top to help further secure the stencil. The painting here was a little trickier since the edge of the lamp shade was involved, but again, slow and steady was the key.


You can see how I ended on the back seam of the lamp shade again.  The lines are not as precise due to the seam here, but again, this side will face the wall. :)


Once I had the bottom row done, placement of the top row was easy peasy.  I simply lined them up.  This time I started on the seam and began working my way around.  Slow and easy.  Looking good!


And here is the finished product!  The gray and white look super crisp against my purple walls and I adore the damask pattern.


Love, love, love!


So, there you are -- what do you think?  Easy peasy way to jazz up an inexpensive lamp shade!  Loving the bang for the buck on this project.

Linking up in these fabulous places:

The Mustard Ceiling


Happy Stencilling!

Tuesday, July 5, 2011

How To:: Banquet Table Turned Desk {Home Office Update}

If you missed the reveal of my banquet table turned home office desk, here is my new workspace!


I love how fresh it looks and feel like I can breathe a little better when I'm in the space. Since I'm all about using what I have to redecorate I thought I'd share my process with you.

I knew I wanted to cover the table and conceal all the fab storage that's underneath, but I didn't want it completely covered in fabric.  I love the tailored look on these inspiration desks.


{desk of Lonny editor in chief Michelle Adams}


A smooth work surface and a tailored skirt were my goals. I decided to paint the table top and wing it from there.  Isn't that how you approach your DIY projects? :-)


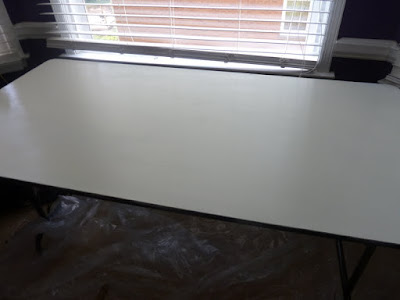
I used two coats of primer, two coats of Porter Paint's Velvet White, and two coats of poly.  Perfect.

Now, for the skirt.  I already had my fabrics for the office makeover.


I wanted the skirt to use two of these fabrics, the Tres Chic by Waverly and the Cross Section by PKL Studios.  The purple velvet is for accent pillows down the road.

I had to play around with different variations, but I eventually decided I wanted the Cross Section to cover the corners and show between the panels of the Tres Chic.  The table is 60 inches across and the fabric is 54 inches wide, so I could basically use 2 yards of the Tres Chic to create the wide front panel and the 2 shorter side panels.  Since the back of the desk fits into the bay window space and there's also an AC vent there, I decided to leave the back completely open. 


I started by cutting my 2 corner panels.  I wanted there to be plenty of overlap, so I cut them about 14 inches wide, knowing I would be hemming the edges.


And since I don't sew {really -- I don't sew}, I enlisted a little DIYer's helper in the form of hem tape.


Sorry for the blurry photo!  I found this product ridiculously easy to work with and it took less than two rolls to hem all 5 panels for the skirt. 

I used another DIYer's helper to attach the corner panels to the table... my hot glue gun.


I burned the stew out my thumb doing this!!  I had forgotten how HOT hot glue really is!


Here's the desk with the corner panels attached.  See how much storage is underneath?  The plastic drawers (Target purchase) hold school and office supplies.

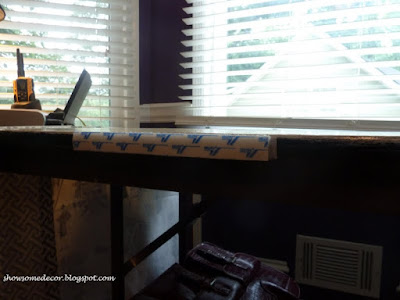
I used a different approach to attach the Tres Chic panels as I wanted to be able to remove them easily if I needed access to underneath.  Enter my next DIYer's helper...


Yep.  Velcro strips. :-)


I simply adhered the strips to the edge of the table, pulled the plastic off the sticky back and pressed the edge of the fabric panel against it.  And here it is!


And a close up of how the corners overlap...

And here is the finished product again:


I was anxious to get this done, since I was "desk-less" for a spell!  Up next in the office is a new lamp (I'll be sharing the shade project with you soon), a revamp of the large dark bookcase, recovering a chair, and I'll be doing some repainting and touch-up to continue the brightening of the space.

So here is the BEFORE of my desk:


SCARY!!

And now the AFTER:


Linking up HERE for Metamorphosis Monday:

Between Naps On The Porch


What are your DIYer helpers?? What about your latest project?

Wednesday, December 22, 2010

Holiday Decorating Tip: All Wrapped Up

As promised, here are the instructions for making a fabulous moss-covered box.  Super easy, and the natural elements look equally at home on your covered front porch or in your foyer on a table.


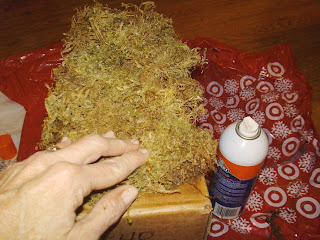
Start with any size box, taped shut (I used a 12x16x5 box), a can of spray adhesive and a bag of moss.  The moss comes in a variety of colors, but I prefer your plain jane green moss because of its texture and all the various shades of green. Be sure to put plastic or newspaper under your workspace.


Spray the adhesive on the box, a small section at a time and press pieces of moss onto the sticky surface.  You will have to press firmly and spread out the moss a bit.


Cover one side at a time, filling in gaps as you go.


Go all the way to each edge, making sure enough moss hangs over the edge to cover the corners.  Work your way around all sides of the box.  You may need to fill a gap or two, or readhere a piece here and there as you work.


Choose a wide ribbon.  Smooth or metallic works best, but I couldn't resist this red and green woven ribbon.  If you choose a woven ribbon, be very careful as you put it around the box;  the moss will stick to it.


Wrap it just as you would a package!

Now to decide where to put it...


 Next to my reindeer...


Or next to my Junk Yard Dog...
I think I'll make a few more and group them together.  :)

And that's a wrap!